Thursday, May 22, 2014

Custom Cornhole Boards

I had a customer request to see how his Cornhole boards made. I've never posted pictures or descriptions before, so I thought why not?

I start off with 4/4 S3S Poplar boards. 4/4 means they are 1" (13/16" in actuality) and S3S stands for Surfaced 3 Sides. This leaves one rough sawn edge. I use 1/2" birch plywood for the playing surface.


After cutting the boards on the table saw to rough dimensions, I run them through the jointer to square the sides with the faces. Then its several passes through the planer to reach 3/4" thickness. I then return to the table saw to rip them to their final width.

Accurately cutting your stock is key. I use a double-ground solid aluminum Master Plate and a digital protractor to ensure a square cut, and a digital "angle cube" for perfect 45 degree angles.


After much trial and error, I finally found made the right template for the legs. The angle on the bottom stays flat on the ground while bringing the height of the back of the board to 12", required for a tournament approved board. I use the bandsaw to cut the round top, and finish it off at the drill press with sanding drum.


Once the corners are cut on the side pieces, I use stacked dado blades to cut a 3/8 x 1/2 rabbet. This allows the plywood top to sit down inside the case. This hides the "plys" and makes the board much stronger and less prone to twisting.


 I use a plate joiner to cut slots in the miters, then add glue and biscuits, again, for added strength.


After gluing up the frame, I glue and brad the top down. Using a 6" hole saw I cut out the 3-point hole. 


After finish sanding & applying primer, I tape off the areas for the logos and spray the main color.


I then use a craft knife to cut out the logo, and paint some more.


After much more painting and touch-ups, they are sprayed with 3 coats of gloss clear water based acrylic. 


The next steps are to cut the holes for the buckling straps and carrying straps. (Pictures to follow)


Wednesday, February 13, 2013

UPDATE, FINALLY!

WOW! It's been a crazy few months here around the homestead. After battling the flu, walking pneumonia & strep throat for 3 weeks straight, our household is finally "sickie free"! Going through all of that put me a tad behind in the shop, but I'm back on course.

Currently working on the oak crib for my friends uncle. Its the same pattern as the crib I build for my daughter, but we changed the spindled back to a solid panel. Its a lot easier to build the second time around! Here is a rendering of what it will look like:

 
Designing my next project for a friend of mine. She was looking for a mudroom bench with coat hooks and over/under storage compartments. She showed me a few items she liked and I measured for fit and came up with this:


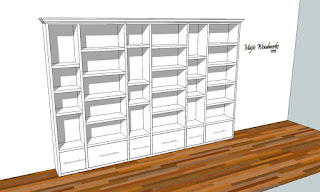
She also wanted a "huge" bookcase for her new family room. This will not only house their collection of books, but also family pictures and home decorations. Bookcase will also feature puck lighting. Approximate size will be 12' wide by 8' high.


And last but not least, a repeat offender (!) wanted a third storage bench, so I drew this up:
 
 
So, If you dont hear from me for a while, I'll be in my workshop beneath a pile of sawdust!  Mark


Tuesday, January 15, 2013

Jigsaw Puzzle Table

My Dads cousin contacted me shortly before Christmas to see if I could build a table for assembling jigsaw puzzles. She is a flight attendant and had seen one in a SkyMall catalog, and wanted to get it for her son. After reading the poor reviews the product was given, she decided to contact me. I had never seen one before, so I did some research online. There was not much info to go on, so I opened up Google SketchUp and got to work. Figuring out the angles for the legs and the fold out leaves was a challenge, but I think it turned out very well.

 Now, if only I had the time and patience to be a "puzzler"!

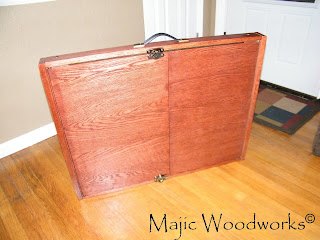
 Folded for transport/storage
 
 Antique Brass Sash locks keep puzzle pieces in place during transport/storage
 
 Legs fold into eachother via rabbets cut on inner legs
 

 Legs splayed @ 115º angle. Notice rabbet cut out of right side legs.

 Leaves open to 165º via brass knife hinges and end cap cut @ 15º on top
 
Completely open and ready to play!
 
 The only puzzle we own: My 4 year olds Dora the Explorer Puzzle!
 
 Fold out leaves hold pieces until they are ready to be fit in the puzzle.
 

Wednesday, January 9, 2013

Busy as a Bee!

Lots goin on in the shop these days. Trying to finish up on a Jigsaw Puzzle Table & a Chess Box. Had to squeeze in a couple of custom washer boxes for some high school softball fundraisers. Got a couple new orders to start working on when I wrap these up. More to follow........


Sunday, December 16, 2012

Adirondack Trio

Tis' the season for giving. A friend of mine is having me make an Adirondack chair with ottman & a couple side tables for a family member. I've only worked with Western Red Cedar once before on a small project, but I love the smell when its being cut. As with a few of my other projects, the wife likes it so much she now wants on for our patio!


Sunday, November 25, 2012

Laundry basket madness

Life in a small house with 2 small children has its challenges. One of the biggest ones I find is what to do with laundry baskets between wash cycles. There is really no place to store them that is out of the way. They always end up on our bedroom floor taking up valuable real estate. Browsing one of my favorite DIY sites (www.ana-white.com) I stumbled upon this unique solution. I'm going to make my own alterations to it to fit my specifics, but all & all, it will look very similar. I probably will leave the lettering off, but I love the distressed paint.

Washer/Dryer Pedestal

Just like the real thing......only smaller.

******UPDATE*******
Finished this mini shed and it turned out great, IMHO! The customer was very pleased and promised Christmas morning pictures! But here are a few photos of the finished project!


On a referral from a wonderful friend, I was contacted by a new client to commission a toy shed to house all of her sons toy tractors. She sent me pictures of their new barn/shed they are having built on their property, and wanted a scaled down version made. I was also given the paint swatches so I could match the sames color pallet! The roof will hinge open and the doors will slide open/closed.

Pictures to follow!